Ever wondered how to create a true stone vase with that textured, earthy organic feel—without spending a fortune or buying fancy supplies? Let me show you how to DIY a stone vase that looks like vintage stoneware, using things I already had at home. Most tutorials leave you guessing on color layering and texture, but I'm here to break that down step-by-step, so you won’t be left guessing which shades achieve that aged look! I also answer the most common questions at the end so you can tackle this project with confidence.

Why This Tutorial is everything you need to know
- No guesswork on colors—I’ll walk you through the exact layers of colors i used
- Unique textures—I used baking soda on two vases and joint compound on a third
- Eco & budget friendly—I reused leftover paint from samples and past projects (Fusion & Sherwin‑Williams cabinet paint), drywall compound, baking soda, and even thrifted Value Village vases.
wANT THE VIDEO TUTORIAL INSTEAD?
Materials You’ll Need


- Plain vases - ones around your home or thrifted
- Primer - I used Rustoleum I had at home but any primer will work
- Drywall (joint) compound + baking soda
- Paint - I used old paint samples, and leftover paint from past projects like Fusion paint and Sherwin‑Williams cabinet paint. Paint from the dollar-store will work just fine too!
- Assorted paints in tan, taupe, dark brown, light grey, rustic orange, black (will get into specifics below)
- 220‑grit sandpaper
- Damp sponge, small brushes, hairdryer
Step‑by‑Step: DIY Vase Painting Tutorial
1. Base Prep & Primer

- Spray primer (I used Rustoleum beige, primer + paint) over all three vases. Use whatever you have!
- Now, you have a consistent DIY vase base layer to start.
- I'd say this step isn't a necessity as the vase won't have "traffic," but if you have some handy, use it!

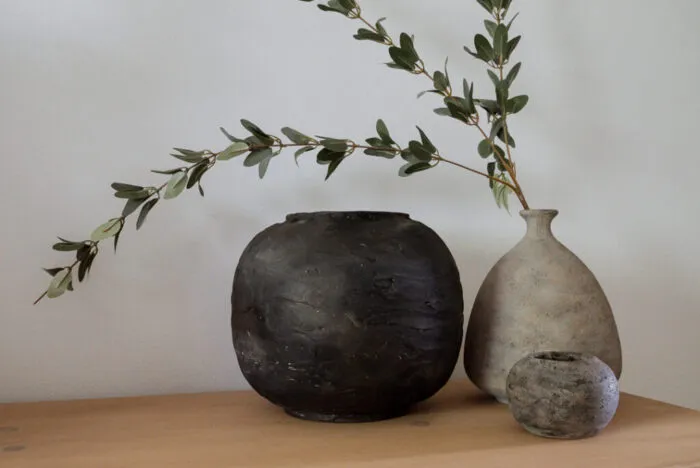
2. Creating a Black Textured Vase (Vase #1)
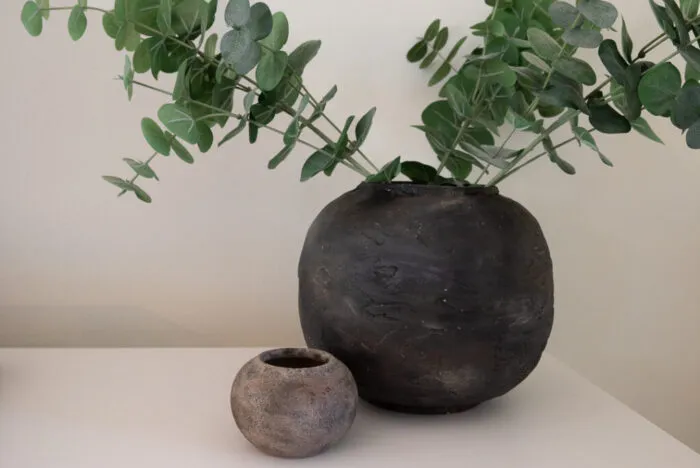
- I wanted a different texture to this vase so after the primer I used joint compound with a butter knife and added a light layer of it around the entire vase. Once dried I used 220 grit to sand down rough edges.

- I used Cathedral Taupe by Fusion, Mocha Black by Bher, and Tricorn Black by Sherwin-Williams for this vase. Anything similar will work just fine.
- Mix each color (light taupe → dark brown → black) with baking soda.

- Using a damp sponge, layer each paint until the desired texture appears. I used a little painting sponge.
- I started with the lightest color first, then worked up to the black. I also would go back and add other spots of the lighter color until I got the desired look. About 5-7 layers in total between the three shades.
- Results in a stunning black textured vase with a natural stone effect.
Tip: Use a hair dryer to speed up the drying time. I also regret not spraying the primer again after the joint compound, as it took a while to get the paint in all the rough grooves. If I used prime it would have been perfect!
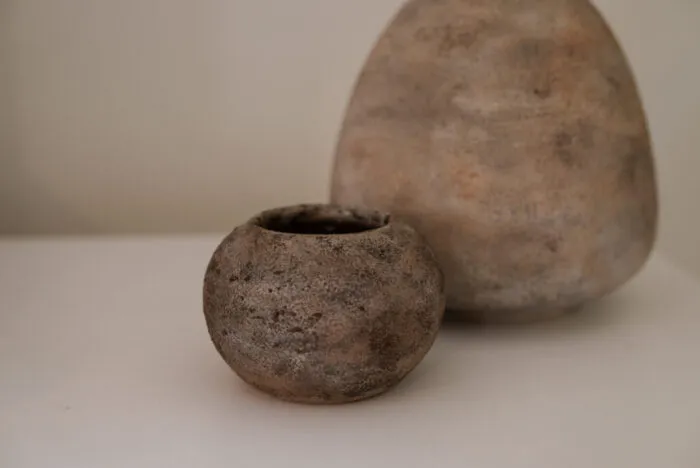
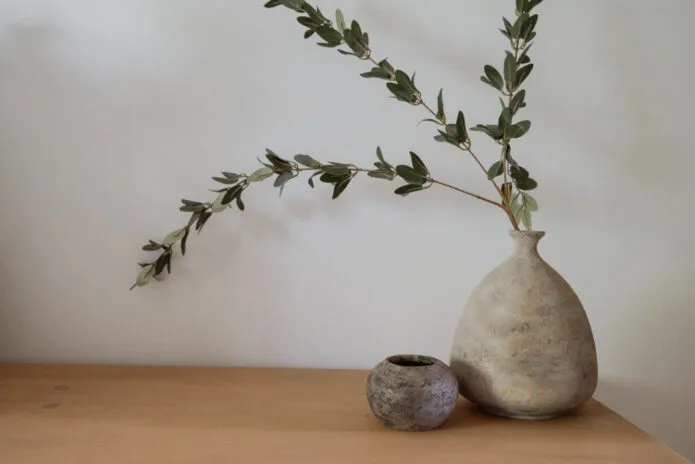
3. Making a Rustic Brown Stone Vase (Vase #2)
- Follow the same technique as the black textured vase except I did not use joint compound. Only the baking soda was used to achieve a textured vase and stone vase look.
- I used light grey, dark brown, tan, and a tiny touch of rustic orange.
- Paint color names were Cobblestone by Fusion, Mocha Brown by Bher, "Tan" Acrylic from the Dollar Store, and a touch of "Rustic Orange'.
- After 5-7 layers of playing with the colours, I mixed extra baking soda in with the tan and mocha brown so it was a very thick paste, and I used my fingers to rub it into the vase in certain spots. This added extra texture and a beautiful look.
- The baking soda adds grit, creating a unique faux‑stone effect—hello, diy rustic vase!

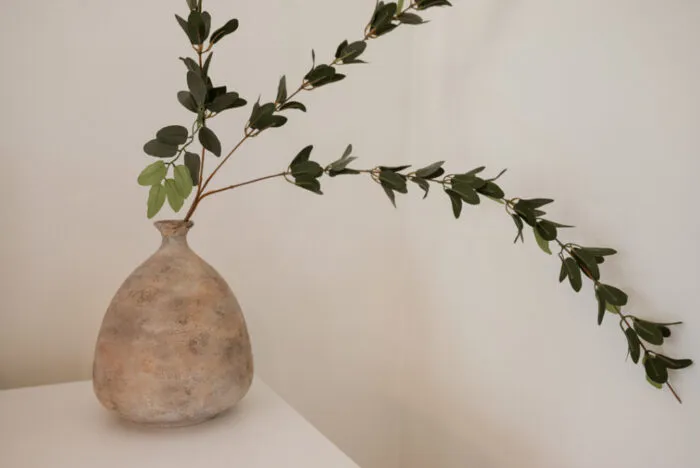
4. Making a grey diy stone vase (Vase #3)

- Same steps that were used for Vase 2 I used here.
- The colors I used were light grey, dark brown, tan, and taupe
- Paint color names were Cobblestone by Fusion, Mocha Brown by Bher, "Tan" Acrylic from the Dollar Store, and Cathedral Taupe by Fusion.

- I started with the Mocha, tan, then taupe, then cobblestone and finished off with the Mocha again.
- At first I used too much Cobblestone and I found the vase was looking too light grey so I went in and rubbed some of the Mocha Brown and it came out looking a darker color which is exactly what I wanted!

- Result? A DIY textured vase that looks like it is from Pottery Barn for a fraction of the cost!
Tip: Sponge or dry-brush each layer to bring out texture. I preferred a damp sponge and to switch it up between dabbing and swiping.
Q&A: Common Questions About DIY textured Vases

I scoured top DIY sources and found that these questions frequently come up. Here's what to know:
Q: What paint-to-baking soda ratio is best?
A: It's recommended roughly 1:1 paint to baking soda for a thick, grainy texture, or 3–4 tsp per cup for a fluffier texture. However, I just eyeballed it and had different ratios per color. Don't overthink it! Just mix and go!
Q: Do I need to prime the vase before painting?
A: Yes. Priming helps paint adhere, especially for slick surfaces. Some glass vase tutorials even begin with spray primer. I'd say if you don't have any, don't spend a ton of this step. The vase barely sees traffic- I wouldn't worry about it too much.
Q: Can I skip the compound layer?
A: Totally—many textured‑vase tutorials (like texturing with wallpaper paste or baking soda) work without it. But drywall compound adds dramatic depth that's hard to mimic otherwise. It all depends what look you are going for!
Q: How durable is a baking‑soda textured vase?
A: Pretty durable—just don’t soak it or use it for food/drink. You could add a matte sealant for extra stability. I did not add any sealant!
Q: Can I mix in drywall compound directly with paint?
A: You could, but applying drywall compound separately (as I did) gives more control over texture depth and shape.
Final Thoughts on making a diy stone vase
If you're after DIY vase ideas that are easy to make and budget friendly, this tutorial empowers you to:
- Mix and match leftover paints
- Create varied textures—smooth, rugged, earthy
- Achieve an authentic faux stone vase or diy concrete vase effect on a budget
- Gives exact colors to achieve the look you want to create
And best of all—no special tools, no mystery colors. Just your creativity, a few thrifted vases, and everyday supplies.
Loved this project? Let’s stay connected!
If you found this DIY guide helpful, don’t forget to save it for later by pinning it to your favorite Pinterest board! It’s the easiest way to come back when you’re ready to tackle this project.

Want more inspiration?
Sign up for my newsletter and get exclusive step-by-step guides, budget-friendly home ideas, and my favorite product recommendations delivered straight to your inbox. Plus, you’ll be the first to know about new DIY projects!

If you loved this project you will love A DIY TEXTURED ART & FLOATING FRAME YOU CAN EASILY MAKE
Or you might like IKEA RAST NIGHTSTAND HACK: FLUTED DRAWERS YOU CAN MAKE EASILY
Let me know how your project turns out—I’d love to see your results!