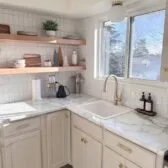
If you're looking for a small kitchen upgrade that makes a big visual difference, swapping out old cabinet hinges for hidden cabinet hinges might be your next weekend project. This one change instantly modernized the look of my kitchen, making it feel custom, clean, and streamlined. And the best part? It’s beginner-friendly and costs around $100-$200, depending on how many cabinets you have.
The key is using the Kreg KHI-Hinge Concealed Hinge Jig CAD link USD link to give you a professional finish on every door! It takes the guesswork out and makes this process foolproof!
I’ll walk you through how I did it, what tools I used, and the key things to know before you get started.


Why Hidden Cabinet Hinges?
Visible hinges can date a kitchen fast, especially the surface-mounted style that sits on the outside of the cabinet face. Hidden hinges (also called concealed or European hinges) tuck inside your cabinet and give it that seamless, high-end look you’ll often see in modern kitchens. It is a great way to make your kitchen feel more high-end without the price tag.
Beyond the aesthetics, many hidden hinges are adjustable, which gives you a bit of wiggle room during installation and makes fine-tuning your cabinet doors much easier.
Step 1: Check Your Cabinet Style
Before you add anything to cart, you'll need to determine if your cabinets are face frame or frameless:
- Face frame cabinets have a front frame that resembles a picture frame. Most older kitchens in North America use this style.
- Frameless cabinets (also called European style) have doors that mount directly to the cabinet box.

Why does this matter? The hinge style and mounting plate you choose need to match your cabinet type.
In my case, I have face frame cabinets, so I chose concealed hinges designed specifically for that.
Step 2: how to Figure Out Your Overlay Size for face framing cabinets
The most common size you'll come across is 1 1/4 inch overlay, but there are others (like 1/2 inch or full overlay). The overlay refers to how much the cabinet door covers the face frame.
If your doors already have hinges, measure how far the door extends past the cabinet frame when closed to determine the overlay. The best way to do this is to mark where the door comes to on the face, then measure the distance from your mark to the edge of the opening, and you'll have your measurement!
I made a mistake and ordered the wrong size and ended up having to return my hinges and order new one!
Step 3: Fill Old Hinge Holes for concealed cabinet hinge install

Since I was switching from surface-mounted hinges to hidden hinges, I had visible screw holes on the front of my cabinet doors.
I filled the holes with wood filler, let them dry, sanded them smooth with 220 grit sandpaper, and then touched them up with primer and paint. If you’re painting your cabinets or doors as part of a bigger update, this is the perfect time to do that step.
Tip: There is nothing worse than thinking you sanded something enough to only paint over it and see everything! Once you think that you have sanded the area enough, look away and glide your fingers over it; if you feel anything, you need to sand more. You want it to feel seamless. I find looking away and just using my fingers helps!
Step 4: Use the Kreg KHI-Hinge Concealed Hinge Jig for Easy Installation of your hidden cabinet hinges

To make drilling for the new concealed hinges foolproof, I bought the Kreg KHI-Hinge Concealed Hinge Jig off Amazon. CAD link USD link
It helped me:
- Mark the correct placement
- Drill the 35mm hole for the hinge cup
- Ensure consistent alignment across all cabinet doors

This is one of those tools that makes the job feel professional, even if it’s your first time doing this type of install. It truly makes the process foolproof and ensures that you have perfect alignment on every door. I can't imagine tackling this without this very affordable tool!
Step 5: Install the Hidden Hinges
I ordered a pack of 1 1/4 inch overlay concealed hinges from Amazon and installed them onto the doors using the template. Once the hinges were attached to the door, I mounted them to the cabinet frame and used the adjustment screws to get everything aligned properly.

It does take a little trial and error to get the doors sitting just right, but the adjustment features make that part stress-free.
Cost Breakdown
Here’s what I spent:
- Hinges (bulk pack on Amazon): $144
- Jig/template tool: $48 CAD link USD link
- Wood filler and sandpaper: $15
Total: $207 CAD for 18 cabinet doors
Keep in mind that your total may vary depending on how many cabinets you’re updating and if you already own some of the tools.
Final Thoughts: HIdden cabinet hinges install

Switching to hidden cabinet hinges was one of those upgrades that made my kitchen feel instantly cleaner and more custom—without a full renovation. It’s a DIY project that’s accessible to beginners, doesn’t require a ton of tools, and offers a big return in terms of style.
If you loved this tutorial check out my blog post on this entire kitchen transformation for more tips and inspiration PAINTING OVER PAINTED KITCHEN CABINETS: A RENOVATION YOU'LL LOVE
You might also like my tutorial on KITCHEN BACKSPLASH TILE: HOW TO DO IT YOURSELF FOR YOUR FIRST TIME
Looking to learn how to paint your kitchen cabinets? THE EXACT BLUEPRINT FOR A FLAWLESS, PRO-LEVEL CABINET PAINT JOB
Hidden Cabinet Hinges: Frequently Asked Questions
Q: Can I install hidden hinges on existing cabinet doors?
Yes! As long as your cabinet door is thick enough to support the hinge cup (typically 5/8" or more), you can retrofit hidden hinges. Just be sure to fill and finish any old hinge holes if you're converting from exposed hinges.
Q: What size hole do I drill for hidden hinges?
Most concealed hinges require a 35mm hole, which is why a hinge jig makes the process much easier and more accurate.
Q: Do hidden hinges work on all cabinet types?
Yes, but you need to know if your cabinets are face frame or frameless, and match the hinge style accordingly. Also, select the correct overlay size (commonly 1 1/4").
Q: Are hidden cabinet hinges hard to adjust?
Not at all. Most modern hinges have three adjustment screws: one for depth, one for height, and one for side-to-side movement. This helps you get perfect alignment after installation.
Q: How long does the project take?
Plan for about 10–15 minutes per door once you get the hang of it. For 14 doors, I completed everything over the course of a weekend.
Ready to elevate your kitchen?
If you’re working on a kitchen refresh, swapping in hidden cabinet hinges is an affordable way to make your space feel more polished and modern—without a full gut job.
loved this project? let's stay connected
If you found this DIY guide helpful, don’t forget to save it for later by pinning it to your favorite Pinterest board! It’s the easiest way to come back when you’re ready to tackle this project.
want more inspiration?
Sign up for my newsletter and get exclusive step-by-step guides, budget-friendly home ideas, and my favorite product recommendations delivered straight to your inbox. Plus, you’ll be the first to know about new DIY projects!

Let me know how your project turns out—I’d love to see your results!